Perspective Effects
Perspective Effects
Commands in the Path | Perspective menu can be used to modify vector objects. The 1 Side, 2 Sides, and Vanishing Point commands let you slant the bounding boxes of vector objects to align with vanishing points. By applying these commands, you can make vector objects appear to be drawn in perspective views.
About the Vanishing Point
The Perspective commands apply perspective effects based on a vanishing point. There is one global vanishing point in a Canvas X document. When you use the 1 Side or 2 Sides commands, you set the vanishing point by dragging a control handle. When you use the Vanishing Point command, you can set the vanishing point by clicking in the document or entering coordinates.
Using the 1 Side and 2 Sides Commands
The 1 Side and 2 Sides commands let you apply perspective effects to vector objects by dragging control handles. To use these commands, select a single vector object or a group of vector objects. These commands are not available if multiple objects are selected, or if a paint or text object is selected.
To Apply Perspective with 1 Side or 2 Sides:
- Select a vector object or a group of vector objects.
- In the Path | Perspective menu, choose 1 Side or 2 Sides.
- Control handles appear at the corners of the bounding box of the selected object. Drag any of the handles to apply the perspective effect. As you drag a handle, guide lines indicate the position of the vanishing point, which extend beyond the current view.
- If you choose 1 Side, the side of the object’s bounding box where you drag a handle will slant to a vanishing point. You can adjust the object’s sides independently.
- If you choose 2 Sides, as you drag a handle, the opposite sides of the object’s bounding box will slant equally toward a vanishing point located along the object’s vertical or horizontal center axis.
- When the pointer is on a control handle, a four-arrow symbol indicates that you can drag horizontally or vertically. To change directions, point to a control handle until the four-arrow symbol appears again.
- When you finish, press Esc to deselect the object.
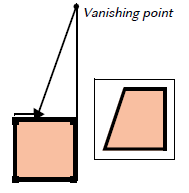 | 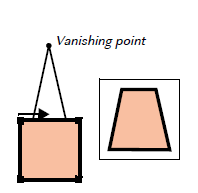 |
1 Side perspective | 2 Sides perspective |
Using the Vanishing Point Command
The Vanishing Point command applies a perspective effect to one or more vector objects. The command slants the bounding boxes of selected vector objects so the objects appear in perspective based on a vanishing point that you select.
The Vanishing Point command is available when vector objects or groups of vector objects are selected. The command is not available if a paint or text object is selected.
To Apply Perspective Using a Vanishing Point:
- Select one or more vector objects or groups of vector objects.
- Choose Path | Perspective | Vanishing Point.
- In the dialog box, change the coordinates to move the vanishing point, or click in the document to set the vanishing point.
- To enter coordinates: Type coordinate values in the text boxes. Coordinates are based on the document’s rulers.
- To set the vanishing point visually: Click Choose. Move the pointer and click to set the vanishing point. The coordinates of the point you click appear in the text boxes.
- To restore the previous vanishing point coordinates: Click Reset.
- Click OK to apply the perspective effect.
The Effects | Remove Effects command will not remove perspective effects that have been applied to objects.
Recent Articles
Quick Reference Guide for canvasxdraw 26 for Windows
Click to view and download the Quick Reference Guide for canvasxdraw version 26. Other related links: Getting Started Guide: https://help.vectorgfx.net/en/canvas_x_draw/getting_started/canvas_x_draw_getting_started.pdf User Guide: ...Quick Reference Guide for canvasxdraw 26 for macOS
Click to view and download the Quick Reference Guide for canvasxdraw version 26. Other related links: Getting Started Guide: https://help.vectorgfx.net/en/canvas_x_draw/getting_started/canvas_x_draw_getting_started.pdf User Guide: ...User Guide for canvasxdraw 26 for macOS
Click to view and download the User Guide for canvasxdraw version 26. Other related links: Getting Started Guide: https://help.vectorgfx.net/en/canvas_x_draw/getting_started/canvas_x_draw_getting_started.pdf Quick Reference Guide: ...User Manual for canvasxdraw 26 for Windows
Click to view and download the User Guide for canvasxdraw version 26. Other related links: Getting Started Guide: https://help.vectorgfx.net/en/canvas_x_draw/getting_started/canvas_x_draw_getting_started.pdf Quick Reference Guide: ...Getting Started Guide for canvasxdraw 26 for Windows
Click to view and download the Getting Started Guide for canvasxdraw version 26. Other related links: Quick Reference Guide: https://help.vectorgfx.net/en/canvas_x_draw/quick_reference/canvas_x_draw_quick_reference.pdf User Guide: ...
Related Articles
Perspective Effects
Perspective Effects Commands in the Path | Perspective menu can be used to modify vector objects. The 1 Side and 2 Side commands let you slant the bounding boxes of vector objects to align with vanishing points. By applying these commands, you can ...Perspective Effects
Perspective Effects Commands in the Path | Perspective menu can be used to modify vector objects. The 1 Side and 2 Side commands let you slant the bounding boxes of vector objects to align with vanishing points. By applying these commands, you can ...Applying Vector Effects to Type
Applying Vector Effects to Type Apply the following vector effects to text objects: Envelope, Extrude, Rotate, Freeform rotate and skew, Flip, Shadow, and Path editing. Use effects to add dimension to text objects and create striking designs. This ...Applying Vector Effects to Type
Applying Vector Effects to Type Apply the following vector effects to text objects: Envelope, Extrude, Rotate, Freeform rotate and skew, Flip, Shadow, and Path editing. Use effects to add dimension to text objects and create striking designs. This ...Applying Vector Effects to Type
Applying Vector Effects to Type Apply the following vector effects to text objects: Envelope, Extrude, Rotate, Freeform rotate and skew, Flip, Shadow, and Path editing. Use effects to add dimension to text objects and create striking designs. This ...
Popular Articles
Version 26 released for all products!
New versions have arrived! Version 26 includes the first macOS universal app compatable with all macOS versions and chipsets! Installers, upgrades, and trial links below: Installer: canvasxdraw version 26 for macOS | Perpetual macOS users looking to ...User Guide for canvasxdraw 26 for macOS
Click to view and download the User Guide for canvasxdraw version 26. Other related links: Getting Started Guide: https://help.vectorgfx.net/en/canvas_x_draw/getting_started/canvas_x_draw_getting_started.pdf Quick Reference Guide: ...Welcome to Vector GFX!
Please bear with us as we are busy updating all of our help content. If you need immeadiate assistance submit a ticket at https://vgfxsupport.zohodesk.com/portal/en/newticket or e-mail info@vectorgfx.net. Other important links: * New: Website: ...Vector GFX: Quality Assurance Program Overview
Vector GFX: Quality Assurance Program Overview At Vector GFX, we are committed to delivering high-performance, stable desktop solutions. Because our software resides directly on our customers' local environments, our Quality Assurance (QA) program ...How many computers can I put a license on?
Overview: Each license can only be used to register the program on two computers. If you are looking to get more than one license, we can offer a discount for multiple licenses. Please contact our sales department at sales@vectorgfx.net. Applies To: ...